OpenCV学习 (English Version)

本文最后更新于:2023年1月24日 14:22

学习网站:https://learnopencv.com/

Read, Display and Write an Image
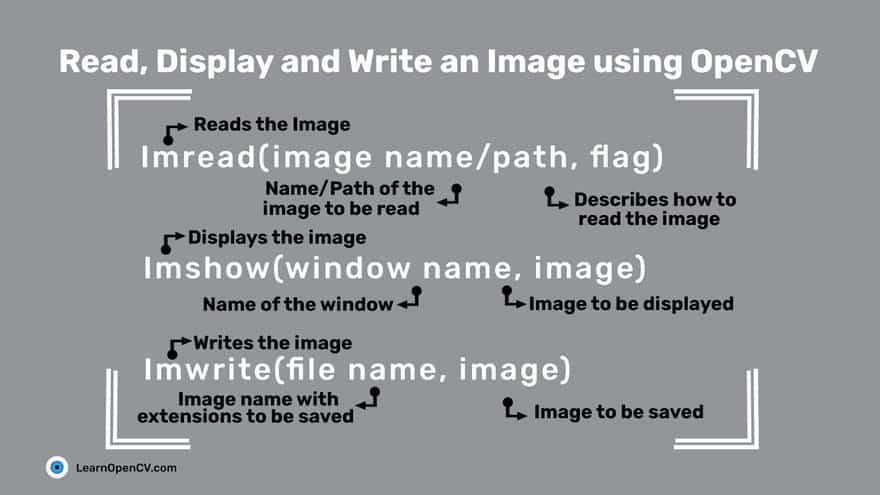
  • cv2.IMREAD_UNCHANGED or -1
  • cv2.IMREAD_GRAYSCALE or 0
  • cv2.IMREAD_COLOR or 1
1
2
3
4
5
6
7
8
9
10
11
12
13
import cv2
img_grayscale = cv2.imread('test.jpg',0)

img_color = cv2.imread('test.jpg',cv2.IMREAD_COLOR)
img_grayscale = cv2.imread('test.jpg',cv2.IMREAD_GRAYSCALE)
img_unchanged = cv2.imread('test.jpg',cv2.IMREAD_UNCHANGED)

cv2.imshow('color image',img_color)
cv2.imshow('grayscale image',img_grayscale)
cv2.imshow('unchanged image',img_unchanged)


cv2.imwrite('grayscale.jpg',img_grayscale)
PY

Reading and Writing Videos

reading

From a file

1
2
3
4
5
6
7
8
9
10
11
12
13
14
15
16
17
18
19
20
21
22
23
24
25
26
27
28
29
30
31
import cv2

vid_capture = cv2.VideoCapture('1.mp4')

if vid_capture.isOpened() == False:
print("Error opening the video file")
else:
# You can replace 5 with CAP_PROP_FPS as well, they are enumerations
fps = vid_capture.get(5)
print('Frames per second : ', fps, 'FPS')

# You can replace 7 with CAP_PROP_FRAME_COUNT as well, they are enumerations
frame_count = vid_capture.get(7)
print('Frame count : ', frame_count)

while (vid_capture.isOpened()):
# vid_capture.read() methods returns a tuple, first element is a bool
# and the second is frame
ret, frame = vid_capture.read()
if ret == True:
cv2.imshow('Frame', frame)
# 20 is in milliseconds, try to increase the value, say 50 and observe
key = cv2.waitKey(20)

if key == ord('q'):
break
else:
break

vid_capture.release()
cv2.destroyAllWindows()
PYTHON
  1. cv2.VideoCapture – Creates a video capture object, which would help stream or display the video.
  2. cv2.VideoWriter – Saves the output video to a directory.
  3. In addition, we also discuss other needed functions such as cv2.imshow(), cv2.waitKey() and the get() method which is used to read the video metadata such as frame height, width, fps etc.
  • get()

    cv2.VideoCapture.get(0) 视频文件的当前位置(播放)以毫秒为单位
    cv2.VideoCapture.get(1) 基于以0开始的被捕获或解码的帧索引
    cv2.VideoCapture.get(2) 视频文件的相对位置(播放):0=电影开始,1=影片的结尾。
    cv2.VideoCapture.get(3) 在视频流的帧的宽度
    cv2.VideoCapture.get(4) 在视频流的帧的高度
    cv2.VideoCapture.get(5) 帧速率
    cv2.VideoCapture.get(7) 视频文件中的帧数

From Image-sequence

1
2
3
vid_capture = cv2.VideoCapture('Resources/Image_sequence/Cars%04d.jpg')

# e.g. Cars0001.jpg, Cars0002.jpg, Cars0003.jpg, etc
PY

From a webcam

1
vid_capture = cv2.VideoCapture(0, cv2.CAP_DSHOW)
PYTHON

You might be wondering about the flag CAP_DSHOW. This is an optional argument, and is therefore not required. is just another video-capture API preference, which is short for directshow via video input.CAP_DSHOW

writing

  • step

    • Retrieve the image frame height and width, using the method.get()

      1
      2
      3
      4
      5
      # Obtain frame size information using get() method
      frame_width = int(vid_capture.get(3))
      frame_height = int(vid_capture.get(4))
      frame_size = (frame_width,frame_height)
      fps = 20
      OXYGENE
    • Initialize a video capture object (as discussed in the previous sections), to read the video stream into memory, using any of the sources previously described.

    • Create a video writer object.

      1
      output = cv2.VideoWriter('Resources/output_video_from_file.avi', cv2.VideoWriter_fourcc('M','J','P','G'), 20, frame_size)
      PYTHON
      • filename: pathname for the output video file

      • apiPreference: API backends identifier

      • fourcc: 4-character code of codec, used to compress the frames (fourcc)

        AVI: cv2.VideoWriter_fourcc('M','J','P','G')

        MP4: cv2.VideoWriter_fourcc(*'XVID')

      • fps: Frame rate of the created video stream

      • frame_size: Size of the video frames

      • isColor: If not zero, the encoder will expect and encode color frames. Else it will work with grayscale frames (the flag is currently supported on Windows only).

    • Use the video writer object to save the video stream to disk.

      1
      2
      3
      4
      5
      6
      7
      8
      9
      10
      while(vid_capture.isOpened()):
      ret, frame = vid_capture.read()
      if ret == True:
      output.write(frame)
      else:
      print('Stream disconnected')
      break

      vid_capture.release()
      output.release()
      PYTHON

Errors

reading

While reading frames it can throw an error if the path is wrong or the file is corrupted or frame is missing.

writing

  • Most common are frame size error and api preference error.
  • If the frame size is not similar to the video, then even though we get a video file at the output directory, it will be blank.
  • If you are using the NumPy shape method to retrieve frame size, remember to reverse the output as OpenCV will return height x width x channels.
  • If it is throwing an api preference error, we might need to pass the CAP_ANY flag in the VideoCapture() argument. It can be seen in the webcam example, where we are using CAP_DHOW to avoid warnings being generated.

Resizing

When resizing an image:

  • It is important to keep in mind the original aspect ratio of the image (i.e. width by height), if you want to maintain the same in the resized image too.
  • Reducing the size of an image will require resampling of the pixels.
  • Increasing the size of an image requires reconstruction of the image. This means you need to interpolate(插值) new pixels.

Width and Height

1
2
3
4
5
6
7
8
9
10
11
12
13
14
15
16
17
18
19
import cv2
import numpy as np

image = cv2.imread('img/000.png')
cv2.imshow('Original Image', image)

# (width, height)
resized_down = cv2.resize(image, (400, 300), interpolation= cv2.INTER_LINEAR)
resized_up = cv2.resize(image, (1200, 900), interpolation= cv2.INTER_LINEAR)

h,w,c = image.shape
# tuple: (height, width, channel)
print("Original Height and Width:", h,"x", w)

cv2.imshow('Resized Down', resized_down)
cv2.waitKey()
cv2.imshow('Resized Up', resized_up)
cv2.waitKey()
cv2.destroyAllWindows()
PYTHON

Scaling factor

1
2
3
scaled_f_up = cv2.resize(image, None, fx = 1.2, fy = 1.2, interpolation = cv2.INTER_LINEAR)

scaled_f_down = cv2.resize(image, None, fx = 0.6, fy= 0.6, interpolation = cv2.INTER_LINEAR)
PYTHON

Interpolation Methods

  • INTER_AREA: INTER_AREA uses pixel area relation for resampling. This is best suited for reducing the size of an image (shrinking). When used for zooming into the image, it uses the INTER_NEAREST method.
  • INTER_CUBIC: This uses bicubic interpolation for resizing the image. While resizing and interpolating new pixels, this method acts on the 4×4 neighboring pixels of the image. It then takes the weights average of the 16 pixels to create the new interpolated pixel.
  • INTER_LINEAR: This method is somewhat similar to the INTER_CUBIC interpolation. But unlike INTER_CUBIC, this uses 2×2 neighboring pixels to get the weighted average for the interpolated pixel.
  • INTER_NEAREST: The INTER_NEAREST method uses the nearest neighbor concept for interpolation. This is one of the simplest methods, using only one neighboring pixel from the image for interpolation.
1
2
3
4
5
6
res_inter_nearest = cv2.resize(image, None, fx= scale_down, fy= scale_down, interpolation= cv2.INTER_NEAREST)
res_inter_linear = cv2.resize(image, None, fx= scale_down, fy= scale_down, interpolation= cv2.INTER_LINEAR)
res_inter_area = cv2.resize(image, None, fx= scale_down, fy= scale_down, interpolation= cv2.INTER_AREA)

vertical= np.concatenate((res_inter_nearest, res_inter_linear, res_inter_area), axis = 0)
cv2.imshow('Inter Nearest :: Inter Linear :: Inter Area', vertical)
PYTHON

Cropping

Basic Cropping

1
2
3
4
5
6
7
8
9
10
11
12
13
14
15
import cv2
import numpy as np

img = cv2.imread('img/000.png')
#(h = 480, h = 640, c = 3)
cropped_image = img[80:280, 150:330]
#cropped = img[h = start_row:end_row, w = start_col:end_col]

cv2.imshow("original", img)
cv2.imshow("cropped", cropped_image)

cv2.imwrite("Cropped Image.jpg", cropped_image)

cv2.waitKey(0)
cv2.destroyAllWindows()
PYTHON

Dividing Into Small Patches

1
2
3
4
5
6
7
8
9
10
11
12
13
14
15
16
17
18
19
20
21
22
23
24
25
26
27
28
29
30
31
32
33
34
35
36
37
38
39
40
41
42
43
44
45
46
47
48
49
50
51
52
53
54
55
56
57
58
59
60
61
import cv2
import numpy as np

img = cv2.imread('img/000.png')

image_copy = img.copy()
imgheight=img.shape[0]
imgwidth=img.shape[1]

M = 160
N = 160
x1 = 0
y1 = 0

for y in range(0, imgheight, M):
for x in range(0, imgwidth, N):
if (imgheight - y) < M or (imgwidth - x) < N:
break

y1 = y + M
x1 = x + N

# check whether the patch width or height exceeds the image width or height
if x1 >= imgwidth and y1 >= imgheight:
x1 = imgwidth - 1
y1 = imgheight - 1
# Crop into patches of size MxN
tiles = image_copy[y:y + M, x:x + N]
# Save each patch into file directory
cv2.imwrite('saved_patches/' + 'tile' + str(x) + '_' + str(y) + '.jpg', tiles)
cv2.rectangle(img, (x, y), (x1, y1), (0, 255, 0), 1)

elif y1 >= imgheight: # when patch height exceeds the image height
y1 = imgheight - 1
# Crop into patches of size MxN
tiles = image_copy[y:y + M, x:x + N]
# Save each patch into file directory
cv2.imwrite('saved_patches/' + 'tile' + str(x) + '_' + str(y) + '.jpg', tiles)
cv2.rectangle(img, (x, y), (x1, y1), (0, 255, 0), 1)

elif x1 >= imgwidth: # when patch width exceeds the image width
x1 = imgwidth - 1
# Crop into patches of size MxN
tiles = image_copy[y:y + M, x:x + N]
# Save each patch into file directory
cv2.imwrite('saved_patches/' + 'tile' + str(x) + '_' + str(y) + '.jpg', tiles)
cv2.rectangle(img, (x, y), (x1, y1), (0, 255, 0), 1)

else:
# Crop into patches of size MxN
tiles = image_copy[y:y + M, x:x + N]
# Save each patch into file directory
cv2.imwrite('saved_patches/' + 'tile' + str(x) + '_' + str(y) + '.jpg', tiles)
cv2.rectangle(img, (x, y), (x1, y1), (0, 255, 0), 1)

#Save full image into file directory
cv2.imshow("Patched Image",img)
cv2.imwrite("patched.jpg",img)

cv2.waitKey()
cv2.destroyAllWindows()
PYTHON

Rotation and Translation

Rotation

1
2
3
4
5
6
7
8
9
10
11
12
13
14
15
import cv2

image = cv2.imread('img/000.png')

height, width, _ = image.shape
center = (width/2, height/2)

rotate_matrix = cv2.getRotationMatrix2D(center=center, angle=45, scale=0.5)
rotated_image = cv2.warpAffine(src=image, M=rotate_matrix, dsize=(int(width*0.9), int(height*0.9)))

cv2.imshow('Original image', image)
cv2.imshow('Rotated image', rotated_image)

cv2.waitKey(0)
cv2.imwrite('rotated_image.jpg', rotated_image)
PYTHON

The getRotationMatrix2D() function takes the following arguments:

  • center: the center of rotation for the input image
  • angle: the angle of rotation in degrees
  • scale: an isotropic scale factor which scales the image up or down according to the value provided

The following are the arguments of warpAffine() function:

  • src: the source mage
  • M: the transformation matrix
  • dsize: size of the output image
  • dst: the output image
  • flags: combination of interpolation methods such as INTER_LINEAR or INTER_NEAREST
  • borderMode: the pixel extrapolation method
  • borderValue: the value to be used in case of a constant border, has a default value of 0

需要注意的是图像宽高一定为整数,因此dsize要加上int()将值改为整数,保证类型正确,否则将会出现如下错误。

1
2
3
4
cv2.error: OpenCV(4.6.0) :-1: error: (-5:Bad argument) in function 'warpAffine'
> Overload resolution failed:
> - Can't parse 'dsize'. Sequence item with index 0 has a wrong type
PYTHON

Translation

Translation (平移)

1
2
3
4
5
6
7
8
9
10
11
12
13
14
15
16
17
18
19
20
21
import cv2
import numpy as np

image = cv2.imread('img/000.png')

height, width, _ = image.shape
center = (width/2, height/2)

tx, ty = width / 4, height / 4

translation_matrix = np.array([
[1, 0, tx],
[0, 1, ty]
], dtype=np.float32)

translated_image = cv2.warpAffine(src=image, M=translation_matrix, dsize=(width, height))

cv2.imshow('Original image', image)
cv2.imshow('Translated image', translated_image)
cv2.waitKey(0)
cv2.imwrite('translated_image.jpg', translated_image)
PYTHON

Annotating

Color Line

1
2
3
4
5
6
7
8
imageLine = img.copy()

pointA = (200,80)
pointB = (450,80)
cv2.line(imageLine, pointA, pointB, (255, 255, 0), thickness=3)

cv2.imshow('Image Line', imageLine)
cv2.waitKey(0)
PYTHON

point(x, y):

  • The x-axis represents the horizontal direction or the columns of the image.
  • The y-axis represents the vertical direction or the rows of the image.

所以上面画的是水平线

Outlined Circle

1
2
3
4
5
6
7
8
imageCircle = img.copy()

circle_center = (415,190)
radius =100
cv2.circle(imageCircle, circle_center, radius, (0, 0, 255), thickness=3, lineType=cv2.LINE_AA)

cv2.imshow("Image Circle",imageCircle)
cv2.waitKey(0)
PYTHON

这个linetype参数并不是指线型是实线、虚线还是点画线,这个参数实际用途是改变线的产生算法。

Filled Circle

1
cv2.circle(..., thickness=-1, ...)
PYTHON

Rectangles

In the rectangle() function, you provide the starting point (top left) and ending point (bottom right) for the corners of the rectangle.

1
2
3
4
5
6
7
8
9
imageRectangle = img.copy()

start_point =(300,115)
end_point =(475,225)

cv2.rectangle(imageRectangle, start_point, end_point, (0, 0, 255), thickness= 3, lineType=cv2.LINE_8)

cv2.imshow('imageRectangle', imageRectangle)
cv2.waitKey(0)
PYTHON

Ellipses

pass

Half-Ellipses

pass

Text

1
2
3
4
5
6
7
8
9
10
imageText = img.copy()

text = 'I am a Happy dog!'
org = (50,350)
# write the text on the input image
cv2.putText(imageText, text, org, fontFace = cv2.FONT_HERSHEY_COMPLEX, fontScale = 1.5, color = (250,225,100))
# display the output image with text over it
cv2.imshow("Image Text",imageText)
cv2.waitKey(0)
cv2.destroyAllWindows()
PYTHON

org specifies the starting location for the top left corner of the text string.

OpenCV supports several font-face styles from the Hershey font collection, and an italic font as well.

Color spaces

RGB Color Space

The RGB colorspace has the following properties

  • It is an additive colorspace where colors are obtained by a linear combination of Red, Green, and Blue values.
  • The three channels are correlated by the amount of light hitting the surface.

the inherent problems associated with the RGB Color space:

  • significant perceptual non-uniformity.
  • mixing of chrominance ( Color related information ) and luminance ( Intensity related information ) data.

LAB Color-Space

  1. L – Lightness ( Intensity ).
  2. a – color component ranging from Green to Magenta(洋红色).
  3. b – color component ranging from Blue to Yellow.

properties

  • Perceptually uniform color space which approximates how we perceive color.
  • Independent of device ( capturing or displaying ).
  • Used extensively in Adobe Photoshop.
  • Is related to the RGB color space by a complex transformation equation.
1
2
img = cv2.imread('cube1.jpg')
imgLAB = cv2.cvtColor(img, cv2.COLOR_BGR2LAB)
PYTHON

YCrCb Color-Space

pass

HSV Color Space

  1. H – Hue 色相 ( Dominant Wavelength ).
  2. S – Saturation 色相 ( Purity / shades of the color ).
  3. V – Value ( Intensity ).
1
2
img = cv2.imread('cube1.jpg')
imgLAB = cv2.cvtColor(img, cv2.COLOR_BGR2HSV)
APACHE
  • There is drastic difference between the values of the red piece of outdoor and Indoor image. This is because Hue is represented as a circle and red is at the starting angle. So, it may take values between [300, 360] and again [0, 60].

segmentation

simplest way

Data Analysis for a Better Solution

Filtering

Image Filtering Using Convolution in OpenCV | LearnOpenCV #

pass

Thresholding

Binary Thresholding

Binary Thresholding ( THRESH_BINARY )

1
2
3
4
5
6
7
8
9
10
11
12
13
14
15
16
17
# Binary Threshold
if src(x,y) > thresh
dst(x,y) = maxValue
else
dst(x,y) = 0

# ---------------
import cv2

src = cv2.imread("threshold.png", cv2.IMREAD_GRAYSCALE)

# Set threshold and maxValue
thresh = 0
maxValue = 255

# Basic threshold example
th, dst = cv2.threshold(src, thresh, maxValue, cv2.THRESH_BINARY);
PYTHON

Inverse-Binary Thresholding

Inverse-Binary Thresholding ( THRESH_BINARY_INV )

1
2
3
4
5
6
7
8
# Inverse Binary Threshold
if src(x,y) > thresh
dst(x,y) = 0
else
dst(x,y) = maxValue

# ---------------
th, dst = cv2.threshold(src, thresh, maxValue, cv2.THRESH_BINARY_INV);
PYTHON

Truncate Thresholding

Truncate Thresholding ( THRESH_TRUNC )

1
2
3
4
5
6
7
8
# Truncate Threshold
if src(x,y) > thresh
dst(x,y) = thresh
else
dst(x,y) = src(x,y)

# ---------------
th, dst = cv2.threshold(src, thresh, maxValue, cv2.THRESH_TRUNC);
PYTHON

Threshold to Zero

Threshold to Zero ( THRESH_TOZERO )

1
2
3
4
5
6
7
8
# Threshold to Zero
if src(x,y) > thresh
dst(x,y) = src(x,y)
else
dst(x,y) = 0

# ---------------
th, dst = cv2.threshold(src, thresh, maxValue, cv2.THRESH_TOZERO);
PYTHON

Inverted Threshold to Zero

Inverted Threshold to Zero ( THRESH_TOZERO_INV )

1
2
3
4
5
6
7
8
# Inverted Threshold to Zero
if src(x,y) > thresh
dst(x,y) = 0
else
dst(x,y) = src(x,y)

# ---------------
th, dst = cv2.threshold(src, thresh, maxValue, cv2.THRESH_TOZERO_INV);
PYTHON

Blob Detection

pass

Edge Detection

pass

Mouse and Trackbar

pass

Contour Detection

Simple Background Estimation

Deep Learning with OpenCV DNN

1
2
3
4
5
6
7
8
9
10
11
InputImg

Input.float().to(Device)

ValDataLoader

ValDataLoader = PipeDatasetLoader(FolderPath, 1)

ValDataLoader = DataLoader(ValDataset, batch_size=1, shuffle=False, drop_last=False, num_workers=0, pin_memory=True)


-

OpenCV学习 (English Version)
https://junyaohu.github.io/2022/08/05/opencv-learning/
作者
JunyaoHu
发布于
2022年8月5日 20:24
更新于
2023年1月24日 14:22
许可协议